


上一篇文章我们分析了ComfyUI的启动过程,这篇文章我们继续阅读源代码,分析 ComfyUI 是如何执行一个工作流的。
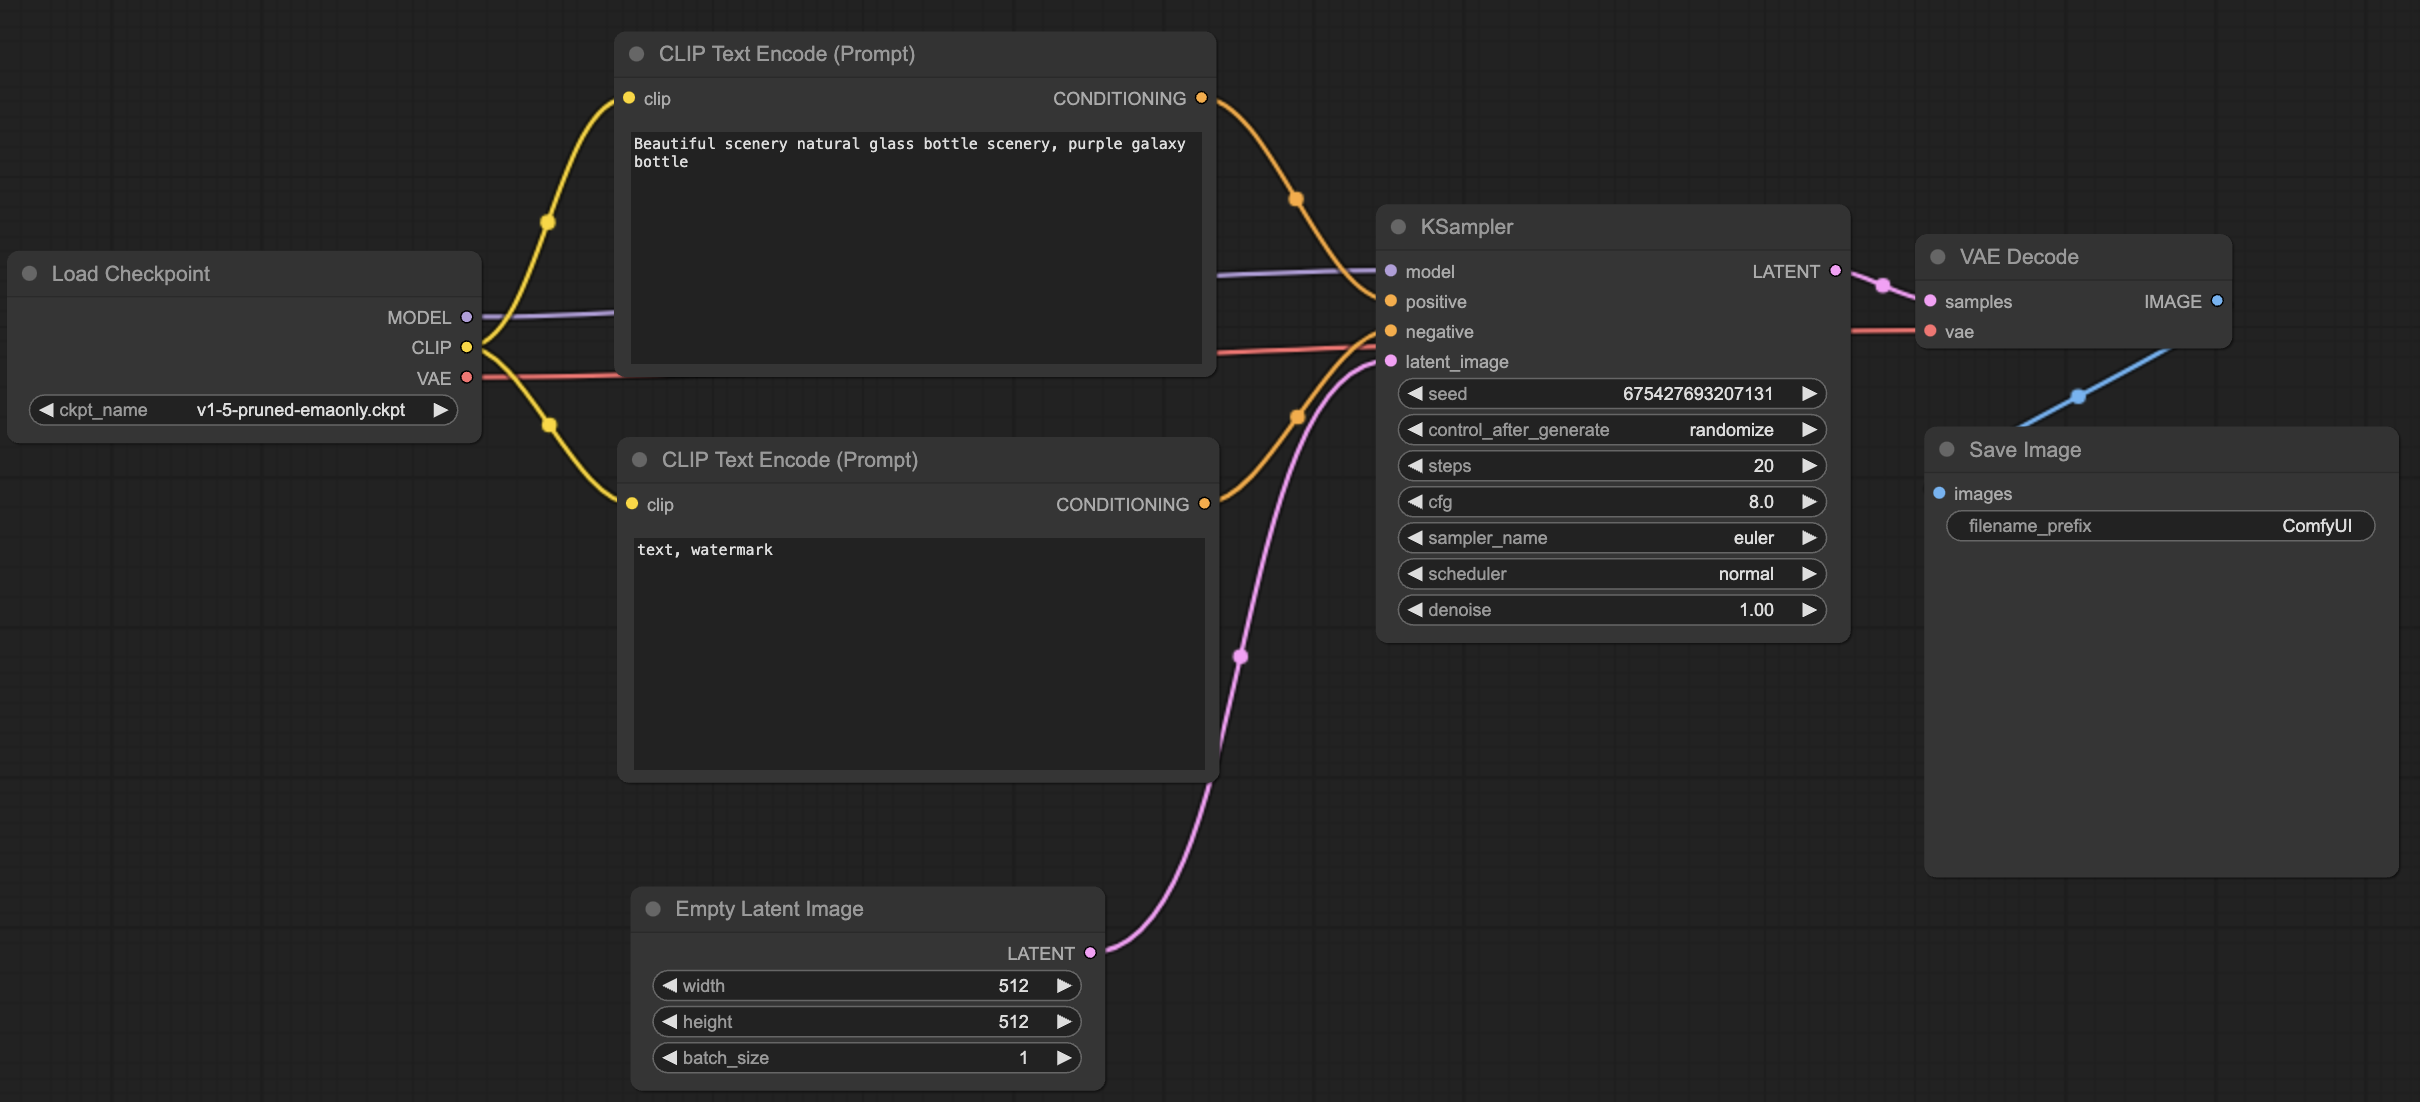
我们以一个简单的 workflow 为例,这个工作流包含了一个加载 sd 模型的节点,两个 Clip 节点提供正向提示词和负向提示词,一个生成 latent image的节点,一个 KSample 采样器,一个 VAE 解码器以及一个输出图片的节点,这是官网示例上一个最简单的 ComfyUI 工作流。
搭建完工作流之后,点击页面右边的 Queue Prompt 执行。我们在代码上加上断点,可以发现接收请求的入口为post_prompt ,主要是对参数进行校验,并将通过校验后的任务加入到任务队列中。
@routes.post("/prompt")
async def post_prompt(request):
    #...... 省略一些内容 ......
    if "prompt" in json_data:
        prompt = json_data["prompt"]
        # 参数校验
        # valid=[True(校验结果), error(错误信息), list(good_outputs)(输出节点), node_errors(错误信息)]
        valid = execution.validate_prompt(prompt)
        #...
        if valid[0]:
            prompt_id = str(uuid.uuid4())
            outputs_to_execute = valid[2]
            # 将 workflow 放入队列
            self.prompt_queue.put((number, prompt_id, prompt, extra_data, outputs_to_execute))
            response = {"prompt_id": prompt_id, "number": number, "node_errors": valid[3]}
            return web.json_response(response)
        else:
            logging.warning("invalid prompt: {}".format(valid[1]))
            return web.json_response({"error": valid[1], "node_errors": valid[3]}, status=400)
    else:
        return web.json_response({"error": "no prompt", "node_errors": []}, status=400)
值得注意的是,参数校验的逻辑有点复杂,其基本原理与后面的执行原理是一样的,我们来仔细分析一下。
参数校验
我们请求的 prompt 任务如下:
{
  "1": {
    "inputs": {
      "ckpt_name": "v1-5-pruned-emaonly.ckpt"
    },
    "class_type": "CheckpointLoaderSimple",
    "_meta": {
      "title": "Load Checkpoint"
    }
  },
  "2": {
    "inputs": {
      "text": "Beautiful scenery natural glass bottle scenery, purple galaxy bottle",
      "clip": [
        "1",
        1
      ]
    },
    "class_type": "CLIPTextEncode",
    "_meta": {
      "title": "CLIP Text Encode (Prompt)"
    }
  },
  "3": {
    "inputs": {
      "text": "text, watermark",
      "clip": [
        "1",
        1
      ]
    },
    "class_type": "CLIPTextEncode",
    "_meta": {
      "title": "CLIP Text Encode (Prompt)"
    }
  },
  "4": {
    "inputs": {
      "width": 512,
      "height": 512,
      "batch_size": 1
    },
    "class_type": "EmptyLatentImage",
    "_meta": {
      "title": "Empty Latent Image"
    }
  },
  "5": {
    "inputs": {
      "seed": 675427693207131,
      "steps": 20,
      "cfg": 8,
      "sampler_name": "euler",
      "scheduler": "normal",
      "denoise": 1,
      "model": [
        "1",
        0
      ],
      "positive": [
        "2",
        0
      ],
      "negative": [
        "3",
        0
      ],
      "latent_image": [
        "4",
        0
      ]
    },
    "class_type": "KSampler",
    "_meta": {
      "title": "KSampler"
    }
  },
  "6": {
    "inputs": {
      "samples": [
        "5",
        0
      ],
      "vae": [
        "1",
        2
      ]
    },
    "class_type": "VAEDecode",
    "_meta": {
      "title": "VAE Decode"
    }
  },
  "7": {
    "inputs": {
      "filename_prefix": "ComfyUI",
      "images": [
        "6", // 依赖的前置节点编号
        0
      ]
    },
    "class_type": "SaveImage",
    "_meta": {
      "title": "Save Image"
    }
  }
}
workflow 参数校验的入口在 validate_prompt(prompt) 函数,其中调用 validate_inputs(prompt, item, validated) 函数对节点的参数和节点间的依赖关系进行校验。
workflow 参数校验的方法是从输出节点开始往前进行深度优先遍历,一直遍历到输入节点为止,在遍历校验的过程中已经校验过的节点存在 validated 数组中,避免重复校验。校验的内容包括:
- 每个节点是否包含
class_type参数 - 所有的节点是否都被加载到
NODE_CLASS_MAPPINGS中,如果没有找到,直接报错。 - 每个请求的 workflow 至少要包含一个输出节点 (node 的定义含有
OUTPUT_NODE属性并且class_.OUTPUT_NODE is True) - 判断 node 输入定义
INPUT_TYPES中的必填字段(required相关字段)有没有在输入里面。 - 判断依赖node链接是否正常。首先判断依赖的前置 node 是否真实存在、类型是否正确,然后本节点的输入类型和依赖node的对应位输出类型(
RETURN_TYPES[n])是否一致。 - 基础类型校验。如果是
INT、FLOAT、STRING这些基础类型,会进行类型强转判断,如果有设置min、max也会判断最小值和最大值范围。 - 自定义输入校验。ComfyUI的链路校验相对较弱,如果node需要自己的特殊校验,可以实现自定义校验函数
VALIDATE_INPUTS。
工作流执行
通过参数验证之后,prompt 任务就会进入到任务队列中,上一篇文章我们讲过,在程序启动时会开启一个线程用于从队列中消费任务并执行。
# main.py->main函数,启动线程执行 promt_worker 函数
threading.Thread(target=prompt_worker, daemon=True, args=(q, server,)).start()

# main.py->prompt_worker(q, server)
def prompt_worker(q, server):
    #...
    while True:
        #...
        queue_item = q.get(timeout=timeout) #从队列中获取任务
        if queue_item is not None:
            item, item_id = queue_item
            e.execute(item[2], prompt_id, item[3], item[4])#执行任务
            #...
prompt_worker() 函数是一个死循环,当队列中含有任务时,会将任务取出执行。执行任务在的实现代码在 PromptExecutor##execute() 函数中,整个执行流程如下:
- 检查和更新缓存。
- 分析工作流依赖关系,生成待执行的节点列表。
- 执行任务。
执行的第一步就是检查和更新缓存,ComfyUI 会在工作流执行的过程中存储每个节点的输出内容、节点的实现类以及上一次的工作流的图结构。当新的工作流节点发生变化时,删除缓存中失效的信息。(具体的内容我们在后面分析)
其次程序会为工作流中的每个输出节点分析依赖关系图,按照依赖个数排序,确定执行的输出节点列表。
for node_id in list(execute_outputs):
	# (0, node_id) 0 是表示的是执行 node_id 节点的链路需要执行的节点个数
    to_execute += [(0, node_id)]
while len(to_execute) > 0:
    #always execute the output that depends on the least amount of unexecuted nodes first
    memo = {}
    # 使用 lambda 表达式对`to_execute`中的每个元组进行转换,调用`recursive_will_execute`函数并计算其结果的长度,同时保留原来的节点 ID。
    to_execute = sorted(list(map(lambda a: (len(recursive_will_execute(prompt, self.outputs, a[-1], memo)), a[-1]), to_execute)))
    output_node_id = to_execute.pop(0)[-1]
execute_outputs 是工作流中所有的输出节点,参数校验会得到这个结果。之后遍历所有的输出节点,调用recursive_will_execute 函数从输出节点开始,利用深度优先搜索的方式递归到没有前置依赖的节点,并记录到 memo 表中,最终返回执行输出节点需要执行的所有节点,按照长度进行升序排序,优先执行第一个(依赖关系最少的)输出节点。
def recursive_will_execute(prompt, outputs, current_item, memo={}):
    unique_id = current_item

	# 递归的结束条件
    if unique_id in memo:
        return memo[unique_id]

	# 节点的输入数据,如上面的json文件所示,例如节点7(SaveImage):
	# "7": {
    #  "inputs": {
    #    "filename_prefix": "ComfyUI",
    #    "images": [
    #      "6", // 依赖的前置节点编号
    #      0
    #    ]
    #   },
    #"  class_type": "SaveImage",
    #}

    inputs = prompt[unique_id]['inputs']
    will_execute = []
    if unique_id in outputs:
        return []

    for x in inputs:
        input_data = inputs[x]
        # 当 input 参数是数组时,第一个表示的依赖的前一个节点,示例中的7号节点SaveImage的输入是6号节点VAEDecode的输出
        if isinstance(input_data, list):
            input_unique_id = input_data[0]
            output_index = input_data[1]
            if input_unique_id not in outputs:
	            # 递归前置依赖节点
                will_execute += recursive_will_execute(prompt, outputs, input_unique_id, memo)

    memo[unique_id] = will_execute + [unique_id]
    return memo[unique_id]
我们用上面的工作流作为函数recursive_will_execute的输入,得到的结果为:['1', '1', '2', '1', '3', '4', '5', '1', '6', '7'],即节点7的依赖关系如下图所示:

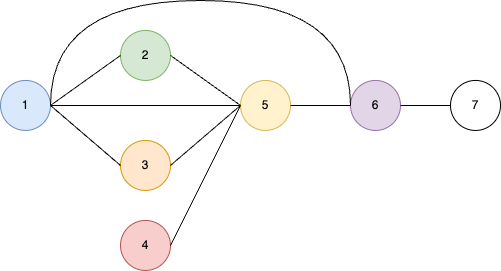
其中的1-7表示节点的编号,节点对应的类如下所示,在执行时会按照编号来编排。
unique_id    class_type
1            CheckpointLoaderSimple
2            CLIPTextEncode
3            CLIPTextEncode
4            EmptyLatentImage
5            KSampler
6            VAEDecode
7            SaveImage
确定执行的输出节点之后,就开始真正地执行工作流。执行的逻辑与分析工作流依赖的方法是一样的,也是从输出节点开始,通过深度优先搜索递归到输入节点,不同的是这一步会调用节点的函数执行,得到输出。
递归调用的逻辑就不再重复说明,我们重点分析一下获取输入、执行节点、以及缓存在执行过程中的使用。
def recursive_execute(server, prompt, outputs, current_item, extra_data, executed, prompt_id, outputs_ui, object_storage):
    # ...
    if unique_id in outputs:
        return (True, None, None)

    for x in inputs:
        input_data = inputs[x]

        if isinstance(input_data, list):
            input_unique_id = input_data[0]
            output_index = input_data[1]
            if input_unique_id not in outputs:
	            # 递归找到,从最上层的节点开始执行
                result = recursive_execute(server, prompt, outputs, input_unique_id, extra_data, executed, prompt_id, outputs_ui, object_storage)
	            #...

    input_data_all = None
    try:
	    # 1. 获取节点需要的输入数据
        input_data_all = get_input_data(inputs, class_def, unique_id, outputs, prompt, extra_data)
        # ...
        # 存储节点的实现类
        obj = object_storage.get((unique_id, class_type), None)
        if obj is None:
            obj = class_def()
            object_storage[(unique_id, class_type)] = obj
		# 2. 执行节点的函数,得到结果
        output_data, output_ui = get_output_data(obj, input_data_all)
        # 3. 缓存输出的结果
        outputs[unique_id] = output_data
        # ...

    return (True, None, None)
节点的输入分成两种,一种是节点本身的输入,例如Clip节点中的正向提示词内容,另一种是来自于前置节点的输出,例如Clip节点需要CheckpointLoaderSimple节点加载模型后获得的Clip 数据。
def get_input_data(inputs, class_def, unique_id, outputs={}, prompt={}, extra_data={}):
    valid_inputs = class_def.INPUT_TYPES()
    input_data_all = {}
    for x in inputs:
        input_data = inputs[x]
        if isinstance(input_data, list):
            input_unique_id = input_data[0]
            output_index = input_data[1]
            if input_unique_id not in outputs:
                input_data_all[x] = (None,)
                continue
	        # 从上一个依赖的节点输出中,获取到本节点需要的输入输入
            obj = outputs[input_unique_id][output_index]
            input_data_all[x] = obj
        else:
	        # 来自本节点的输入
            if ("required" in valid_inputs and x in valid_inputs["required"]) or ("optional" in valid_inputs and x in valid_inputs["optional"]):
                input_data_all[x] = [input_data]

    if "hidden" in valid_inputs:
        h = valid_inputs["hidden"]
        for x in h:
            if h[x] == "PROMPT":
                input_data_all[x] = [prompt]
            if h[x] == "EXTRA_PNGINFO":
                input_data_all[x] = [extra_data.get('extra_pnginfo', None)]
            if h[x] == "UNIQUE_ID":
                input_data_all[x] = [unique_id]
    return input_data_all
根据节点的输入和节点的实现类,通过动态加载的方法,调用节点中定义的 FUNCTION 函数。
def get_output_data(obj, input_data_all):

    results = []
    uis = []
    # 节点真正的执行逻辑,执行节点中定义的属性 FUNCTION 函数
    return_values = map_node_over_list(obj, input_data_all, obj.FUNCTION, allow_interrupt=True)
    #...

def map_node_over_list(obj, input_data_all, func, allow_interrupt=False):
    # check if node wants the lists
    input_is_list = False
    if hasattr(obj, "INPUT_IS_LIST"):
        input_is_list = obj.INPUT_IS_LIST

    if len(input_data_all) == 0:
        max_len_input = 0
    else:
        max_len_input = max([len(x) for x in input_data_all.values()])

    # get a slice of inputs, repeat last input when list isn't long enough
    def slice_dict(d, i):
        d_new = dict()
        for k,v in d.items():
            d_new[k] = v[i if len(v) > i else -1]
        return d_new

    results = []
    if input_is_list:
        if allow_interrupt:
            nodes.before_node_execution()
        results.append(getattr(obj, func)(**input_data_all))
    elif max_len_input == 0:
        if allow_interrupt:
            nodes.before_node_execution()
        results.append(getattr(obj, func)())
    else:
        for i in range(max_len_input):
            if allow_interrupt:
                nodes.before_node_execution()
	        # 通过 getattr 函数获取对象 obj 的名为 func 的属性(通常是一个方法,然后使用关键字参数解包 input_data_all 来调用这个方法。这样做可以动态地获取对象的方法并使用灵活的参数进行调用,增强了代码的灵活性和可扩展性。
            results.append(getattr(obj, func)(**slice_dict(input_data_all, i)))
    return results
这里需要提一下,为了适配不同节点的自定义输入,一般会将输入信息放入字典,用 * 运算符展开,自动匹配入参。所以在自定义node时,需要将INPUT_TYPES中的命名与obj.FUNCTION真实命名对齐。
例如在节点1 CheckpointLoaderSimple 的实现中,定义了 FUNCTION 的值为 load_checkpoint,因此上面的方法最终会调用到 def load_checkpoint(self, ckpt_name) 中,根据路径去加载 sd 模型,返回 model, clip, vae 这三个值。
'''
每个comfyui节点都包含的几个内容:
1. def INPUT_TYPES() 输入类型,用于定义该节点的输入格式
2. RETURN_TYPES 输出类型,表示该节点返回的类型
3. FUNCTION  函数名,用于定义该节点的功能函数,节点类中包含具体的实现方法
4. CATEGORY 分类,用于定义该节点的功能类别
'''
class CheckpointLoaderSimple:
    @classmethod
    def INPUT_TYPES(s):
        return {"required": { "ckpt_name": (folder_paths.get_filename_list("checkpoints"), ),
                             }}
    RETURN_TYPES = ("MODEL", "CLIP", "VAE")
    FUNCTION = "load_checkpoint"

    CATEGORY = "loaders"

    def load_checkpoint(self, ckpt_name):
        ckpt_path = folder_paths.get_full_path("checkpoints", ckpt_name)
        out = comfy.sd.load_checkpoint_guess_config(ckpt_path, output_vae=True, output_clip=True, embedding_directory=folder_paths.get_folder_paths("embeddings"))
        return out[:3]
每个节点执行完成后,都会将输出结果存储在 outputs 字典中,将节点的实现类存在 object_storage 字典中。如果下一次递归发现还是同样的节点就直接返回,避免重复执行,因此像在检查依赖关系时生成的关系节点列表并不会全部执行都执行,最终只会执行以下这些节点,节点 1 只会被执行一次。

(图中绿色的节点为被跳过的节点)
另外,我们在上文中还提到,工作流执行完成一次之后,会缓存完整的工作流节点。假如用户第一次执行workflow后,后台会保存每个node的生成结果outputs。还是以上面的workflow为例,假如修改了node 5(KSampler)的输入seed。则当用户第二次请求时,node 5的前置执行节点时不需要变动的,后续节点需要变动。于是:第二次的执行流程就可以精简如下:
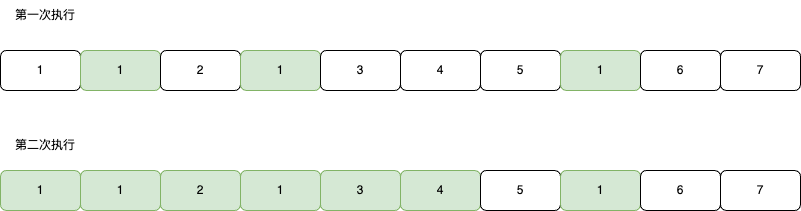
(图中绿色的节点为被跳过的节点)
第一次用户请求需要执行7个node,第二次只需要执行3个node。
怎么判断node是否改动呢?有两种场景,一个是node本身的请求带了is_changed标记;另一个是服务端本身记录了上一次执行的输入信息old_prompt,会判断输入信息是否有变动,inputs == old_prompt[unique_id]['inputs']。
总结
我们围绕 ComfyUI 工作流执行展开,解析了其参数校验的复杂逻辑及工作流执行过程,包括从任务入队、依赖分析到节点执行与缓存机制。
本质上 ComfyUI 工作流的参数校验和执行都是使用了深度优先搜索的方式,同时在执行的过程中利用各种缓存减少节点的重复执行。下一篇文章我们会继续以这个文生图的节点流为例,分析 ComfyUI 是如何在工程上实现 Stable Diffusion 生图的。
评论区